Hi friends, Welcome to Solidworks tutorials for beginners and in this tutorial you are going to see how to use Solidworks circular pattern feature tool for reducing the efforts of product designers a lot. Circular pattern feature tool helps to patternizing the feature, body or face in circular manner. As you seen in earlier solidworks tutorial about Linear pattern Feature tool, same also explains here. But the only difference is that creating circular patterns of your body design.
What is SolidWorks Circular Pattern Feature Tool?
SolidWorks circular pattern feature tool is one of the useful tool which helps to create feature, body or face in circular manner. You can duplicate the your feature in a circle. That means you can arrange it in circular directions. Applications of Circular pattern feature tool is that easy to create different types of pipe flanges, car wheels or anything that can be patterenize in circular fashion. Checkout Best SolidWorks Training Materials here.
Let us see the step-by-step guide for using circular pattern feature tool in SolidWorks CAD software.
How to Use SolidWorks Circular Pattern Tutorial?
Here , you are going to see the how to use circular pattern feature tool effectively by creating a pipe flange example.
Open SolidWorks CAD software. Click on the ‘New’ button from the quick access toolbar or from file menubar. From that, select ‘Part’ and click ‘OK’. Then you can see the Main user interface of SolidWorks modeling software.
File -> New -> Part -> OK
Select the default “Top Plane” from the Features DesignTree manager. Go to Heads-up toolbar and click on “View Orientation” and click on “NormalTo”. Then you can see the Top plane view changes from isometric to XY plane.
Here, I am going to create two circles; calling it as inside circle and outside circle. Former having a diameter of ‘30 mm’ and latter having diameter of ‘60 mm’. You can use the smart dimension tool to apply diameters for your circles.
Step 3: Use Extrude Boss to Make Sketch to Solid Body
‘Exit the sketch’ and go to Feature command manager and apply extrude boss to add material to create sketch as 3D solid body.
You have to enter the pipe flange thickness as ’12 mm’ as already marked in the above image and click on ok button.
Step 4: Find the Hole Center Point on Pipe Flange
According to pipe flange specifications, there should a “pitch circle diameter or PCD” for holes. Here PCD = 45 mm and you have to represent it in your solid flange to find the center of holes.
For that, select the face of the body and go to sketch command manager and create a ’45 mm’ diameter circle over it.
Also create small circle having diameter of ‘10 mm’ by snapping the center in PCD circle.
Once, you got the hole circle center, you can delete the pitch circle by using ‘Delete’ option.
Step 6: Create an Axis for Applying Circular Pattern
Axis creation is important in circular patterning process which is used as the base point. You will get the required pattern around the axis.
For making axis, Go to Features command manager and click on the down arrow of ‘Reference Geometry’. From the drag down menu, you can select the “Axis” option.
You can see the ‘Axis property manager’. From that, select the face where you want to create an axis parallel to it. Here, the face is cylindrical and automatically selects the cylinder center as axis.
Now, you have the all required items for applying the Circular pattern feature tool.
Select The Circular Pattern Feature Tool
You can get this tool in two ways and they are:-
From Features command manager
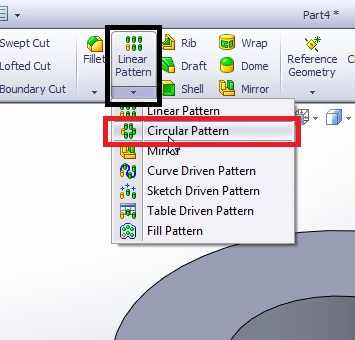
Go to Features Command manager and click on the down arrow of ‘Linear pattern tool’ and select the “Circular pattern’ from it.
From SolidWorks Menubar
Go to ‘Insert’ menu and select “pattern/mirror’ from the drag down menu. Then you will see side drag down menu and select “Circular Pattern” tool feature from it.
Insert -> Pattern/Mirror -> Circular Pattern
Click on the tool option and you will the ‘Circular Pattern Property manager’. From that, first you have select the axis for propagating your pattern in circular manner.
Then also set the angles between the holes and no of holes as you needed in the pipe flange design.
Note:-
If you are not sure about the angles between the holes, select the “Equal Spacing” and set the no of holes. The solidworks cad software will automatically arrange the holes equally on your flange design.
Next, Select features to pattern. So, I am select the cut hole (extrude cut-1 in my example image) in the pipe flange design as shown in the figure. You can also see the circular pattern preview too.
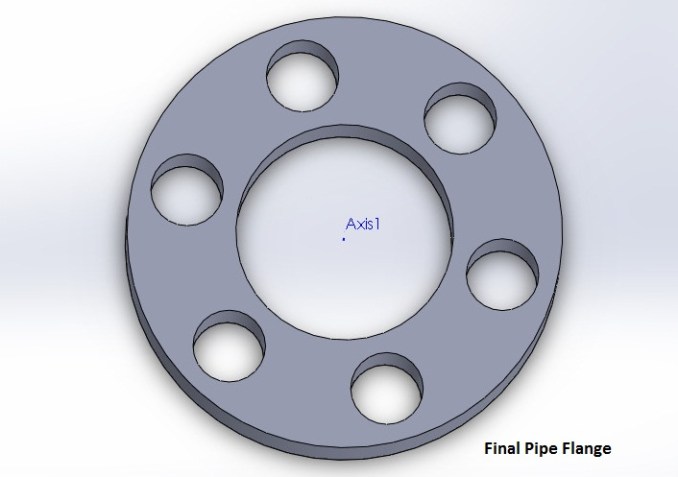
Click on the ok button to complete the circular patterning feature and final pipe flange image is shown below.
This is the way you can use the solidworks circular pattern feature tool in effective way. There are lot of applications for this pattern feature tool and you will see each one of the in the upcoming solidworks tutorials.
Checkout the SolidWorks Video Tutorial about Circular Pattern Feature Tool on YouTube