SolidWorks Tutorial 31: How to Use SolidWorks Draft Tool Features
Welcome to SolidWorks Tutorials for beginners and in this tutorial you are going to see that how to use solidworks draft tool feature application in CAD. You can also get information about the Solidworks draft tool, draft propertymanager, it uses with an examples and engineering design applications opportunities of this tool. Let us explore about Draft tool in SolidWorks CAD software.
What is SolidWorks Draft Tool?
Solidworks draft is features tool which used to create tapered faces on specified angle, using a netural plane or parting line. The draft tool is located in both features CommandManager and Insert Menubar. You can apply this feature tool directly on designed model to get tapered surface with desired angle. Checkout Best SolidWorks Training Materials here.
The solidworks draft propertymanager is main controller of this tool which is used to set the angle, and types of drafting. There are three types of drafting is possible with Solidworks Draft tool. They are Neutral Plane Draft, Parting Line Draft and Step Draft. You will see each type of drafting step by step tutorial in this post.
Note: You can also do drafting while using the Extrude Boss/Base features tool using its propertymanager. But you cannot control the drafting surface like in the Solidworks Draft tool.
Watch SolidWorks Draft Tutorial Video Here:-
Let us see the step by step tutorial each type of draft tool in solidworks cad software.
How to Use SolidWorks Draft_Netural Plane Drafting Tutorial
In neutral plane draft, you should select a base plane or neutral plane, from where the tapering of face have to be applied. From the neutral plane, the inner or outer face tapering or drafting is possible and no changes will happening to neutral plane. This is called neutral plane draft and which located in the Solidworks Draft propertymanager.
Step 1: Create New Solidworks Part File
Open the solidworks cad software and create new part file. Select the default plane (Top plane), and “NormalTo” it using the view orientation tool from the View Headsup toolbar.
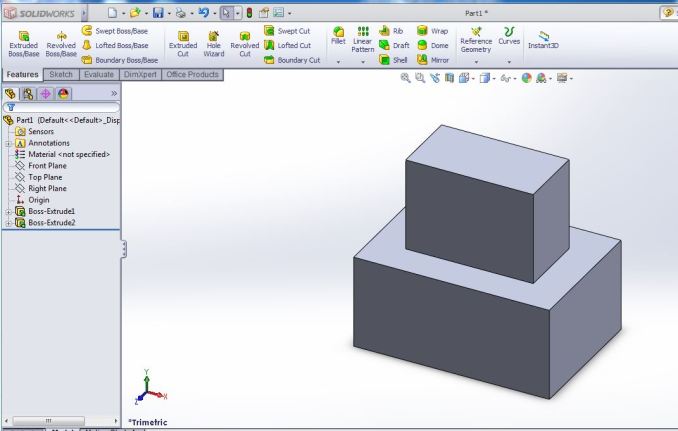
Step 2: Sketch Part and Apply Extrude to make 3D
Here I drawn a rectangle and extrude it using extrude boss/base tool. Again I drawn another rectangle on the top of the previously extruded rectangle part and extrude it which is shown in below figure.
Step 3: Select SolidWorks Draft Tool
Using Features toolbar

Go to Features Commandmanager, and click on the “Draft” tool to select it.
Using Menubar

Go to Solidworks menubar, click on the “Insert Menu” , then you can see drop down menu. From that, select “Features” and you can see side drop down menu and in that click on the “Draft” tool to select it.
Insert Menu -> Features -> Draft tool
Step 4: Apply SolidWorks Draft Tool
Then you can see the “SolidWorks Draft Propertymanager” which is shown below.

Here, you have to apply “Neutral Plane draft”, so select the “Neutral Plane” in the Type of Draft section. Then set or enter the Draft angle to taper the face of your model as per the design requirements. From example draft angle is selected as “12 degree”.
Then select the “Neutral Plane” in model as shown in the figure below.

After that, select the “faces to draft” in the blue box, by clicking on the faces of the model using mouse pointer, also shown in the figure below.

It also contains an option called “face propagation” which helps to control the extent of the draft feature to other connected faces. Face propagation contains options such as along tangent, all faces, inner faces and outer faces. To get more information look on the Draft property manager additional information.
In this example, I am selecting only one face to apply draft or taper that is shown in the above figure.
Click green button to apply draft feature to selected plane and final image is shown below.

You can apply draft to all faces, inner faces or outer faces using face propagation tool. The effect of face propagation in Solidworks draft tool is shown below.
Neutral Plane Draft: All faces
The tool will select all faces and apply set draft angle to the all faces according to selected neutral pane.


Neutral Plane Draft : Inner Face
It will automatically select the inner faces contained in model as per the set neutral plane location.


Neutral Plane Draft: Outer Face
It will automatically select the outer faces of the deigned model attached to neutral plane.


To get more How To Tutorials, Follow me on Facebook, Twitter, GooglePlus and YouTube.

SolidWorks Tutorials 2: Line Sketching Tool

SolidWorks User Interface (UI)
