Welcome to Solidworks Tutorials for Beginners and today, you are going to see how to use the circular sketch pattern tool in Solidworks cad software. It is one of the useful tools to create patterns in circular manner like holes around circular disc or drawing the sketch of pipe flange holes etc. Let us see how to create circular pattern over a circular disc in the below example.
Circular Sketch Pattern is sketch tool which helps to make sketch of circular pattern by adding different closed profiles like circle, rectangle, etc. This tool is mainly located in the sketch command manager with Linear Sketch pattern tool. You can also access it from the “Tools menu” within the “sketch tools”. Let us see the working of circular pattern tool in below step-by-step Solidworks tutorial.
Open the SolidWorks and New part File. If you don’t know it, read How to Create New Part File. Select the Plane (e.g. Top Plane) and normalize using the “Normal To” Button.
Step 2: Draw Base Circle
The second step is creating a base circle with any radius (here dimensions are taking roughly) using the Circle sketch tool.
Step 3: Creating Small Circle on Base Circle
In this step you have create a small circle on the base circle curvature using the Center Circle sketch tool.
Click on the small circle before going to select the Circular pattern tool.
You can also get it from the Solidworks menu bar. Go to “Tools menu” and click on the “Sketch Tools” and select the “Circular Sketch Pattern” from it.
Step 5: Edit Circular Pattern Property
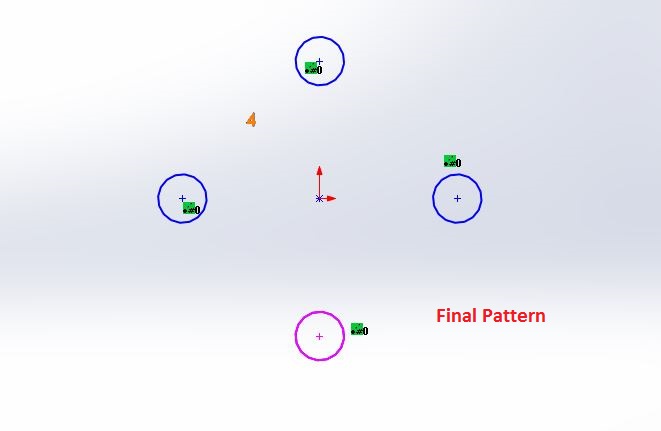
Select the small circle as mentioned earlier. In the Circular pattern property manager, you can fix the number of circles as you want around the base circle by entering in the “Number of instances” section. Here I entered ‘4’ as number of instances.
Tick on the equal spacing, so that you will get equally spaced circles in the pattern. You can also set the dimension of the base circle by entering the portion just below the number of instances section as shown in the below figure.
After editing all these things, just click on green tick button and you can see the four small circles arranged in circular manner.
You can also delete the base circle by clicking on it and press the delete button in your keyboard.
This way you can create Circular pattern in your SolidWorks CAD program. If you have doubt in this Solidworks Tutorials, feel free to contact me.