Linear Pattern Features Tool Tutorial | SolidWorks Tutorials 32
Welcome to SolidWorks Tutorials for Beginners series and in this CAD tutorial you are going to see how to use the SolidWorks Linear Pattern features tool to create patterns of closed profile in extruded parts. This is like Sketch linear pattern tool, but the only difference is that patterning of features is done; click here to see tutorial. You can see the various linear pattern applications in step by step tutorial and its property manager.
What is Linear Pattern Features Tool?
Linear pattern features tool is a placed features tool which is used to create patterns of features in linear manner. For linear patterning, there is parent pattern (base pattern) which used to create the array of patterns in one or two dimension. The patterns should follow the exact shape of the Main pattern. If you do any changes in the base pattern, it will automatically update to other pattern shapes produced from the base pattern. Checkout Best SolidWorks Training Materials here.
Linear pattern features tool is located in both features commandmanager or insert menubar. You can see the linear pattern propertymanager, if you click on it. The property manager is controls the application of linear pattern feature in SolidWorks cad software. It contains various options like Direction 1, Direction 2, Features to pattern, Faces to Pattern, Bodies to pattern, Instances to skip and options.
Direction 1&2: It selects the direction of linear patterning in x axis or y axis (1D/2D). The direction reference is more helpful, if you select the axis or edges in the direction as you need to create linear pattern.
Features to Pattern: Here, you have to select the base pattern for performing pattering process.
Faces to Pattern: If you want to pattern the face of the feature, you can use this option
Bodies to Pattern: It helps to create the entire body feature pattern.
Instances to Skip: It is used to remove some intermediate instances from the created pattern. You cannot remove the base pattern using option.
These are the linear pattern property manager options and let us see how to apply linear pattern features tool in SolidWorks cad software.
Watch SolidWorks Linear Pattern Feature Tool Step By Step Tutorial:-
How to Use SolidWorks Linear Pattern Features Tool
Here I have rectangular plate having thickness 10 mm. I want to create hexagonal pattern in plate.

Step 1: Create New Part File
Open Solidworks CAD software and create new part file. Then select any one of the default from the Featuremanager designtree like Top, Front or right plane. Here I selected the “Right Plane” and make “NormalTo” using view orientation tool from The Solidworks Headsup toolbar.
Step 2: Create Base Pattern on Rectangular Plate
Select the top face of the rectangular plate and go to the “Sketch graphics area”. Use the “Polygon sketch tool” to create hexagon by setting sides no is ‘6’.

“Exit the sketch” and go to Features Command manager.

Use SolidWorks Extrude cut feature tool to create hexagon cut into the rectangular body and this cut extrude file used as “Base Pattern” for linear patterning.
Step 3: Select Linear Pattern Features Tool
From Features Toolbar

Go to features command manager and click on the “Linear Feature Tool” to select it.
Or
From menu bar

Go to solidworks menubar and click on the “Insert menu”. Then you can see drop-down menu, in which select “Pattern/Mirror”. Again you can see side drop down menu in which click on the “linear pattern”. Then you can see the Linear pattern property manager on your solidworks user interface.
Step 4: Apply Linear Pattern Features Tool

Click on the “Features to Pattern” tab in property manager. Then go to features manager designtree and select your “Cut Extrude 2 (base pattern)”
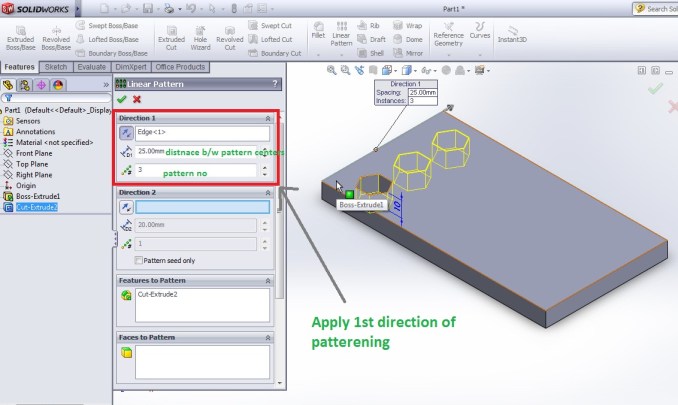
Then you have to select the direction reference which gives idea to tool to create array of patterns in x or y direction. Here I am selecting the nearby edge which is shown in the above image. The spacing set as “25 mm” and Number of instances set as “3”.

After that I also want to create pattern in the longitudinal direction of rectangular plate. For that I am select the length side edge is shown in the above figure. Here spacing is set as “25 mm” and number instances selected as “5” for filling the entire rectangular plate face.
Then click green tick button for OK and you can see the final linear patterned model below.

Linear Pattern Features Tool Tutorial: How to Use Instances to Skip

Go to the Solidworks manager designtree and select the “LPattern 13”. Then click the right mouse button and from appearing dialogue box, select the “Edit Feature”.

You can see the linear pattern property manager and go to “Instances to Skip” tab and click on it. The created patterns center points color change to “pink”. Move your mouse pointer to pink colored points and click on it to remove the certain selected patterns.
Click OK to get final image.

To get back the removed instances, again you need to click on the edit feature and delete the selected instances from the “Instances to skip” tab. In this way you can get it back.
To get more How To Tutorials, Follow me on Facebook, Twitter, GooglePlus and YouTube.

SolidWorks Boundary Cut Feature Tool_SolidWorks Tutorial 34

SolidWorks Tutorials 15: Extrude Cut Feature
