How to Make a Sphere in SolidWorks Tutorial for Beginners
Hai friends, welcome to solidworks tutorial for beginners and in this step by step tutorial, you are going to see how to make a sphere in solidworks. This SolidWorks tutorial helps you to design a sphere as well as Revolved Boss Base feature tool uses. Also explains how to make half sphere in solidworks for beginners.
I am assuming you guys are very clear about what is a sphere? If you are not click here
Checkout Basic SolidWorks Training Materials here.
Let us start to make a sphere in SolidWorks cad software.
Table of Contents
How to Use SolidWorks Revolved Boss Tool to Make a Sphere?
For all Solidworks tutorial, you have to first create part file to make 2d sketch.
Step-1: Create New Part File
Open the SolidWorks CAD software and click on “New” and select “part” from the appearing dialogue box. And click “Ok”.
Select “front Plane” and apply “Normal To” and you can start 2D drawing on it.

Step-2: Draw Axis and Arc Sketch
For making Axis using centerline sketch tool, go to “Sketch command manager” and select “centerline” sketch tool from it.

And draw centerline through the origin as shown in the figure. This centerline sketch act as an axis for this Solidworks sphere tutorial.

For making half circle sketch, again go to the sketch command manager and select “center point arc sketch tool”.

Then, draw arc on the front plane by fixing the center as origin which is shown in the figure. You could set radius of arc by using “Smart Dimension Tool”.

Click on “exit the sketch”.
Step-3: Apply Revolved Boss Base Feature Tool
Go to “Features Command Manager” and select “Revolved Boss Base” feature tool from it.

It will ask you to select a plane or sketch to apply solidworks revolved boss base tool. You can select sketch as you created earlier from the Featuremanager design tree.
Here, select “sketch-2” and it will automatically select axis of revolution as “Line1@sketch2” and apply direction-1 specifications to circle sketch. The angle of revolution is given as “360 degree” and it will make a complete solid sphere in solidworks.
The preview of sphere given below.

Step-4: Final
Click green tick button to apply “OK” in revolved boss base property manager.

How to Use Revolved Boss Tool to make Half Sphere
For making half sphere from the above sphere, go to featuresmanager design tree and select and right click on the “revolve” as shown in the figure.
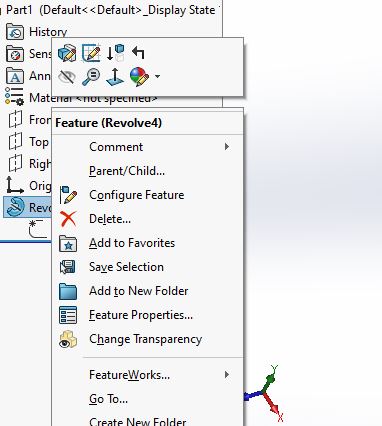
Select “edit feature” and change angle as “180 degree” to convert the complete sphere to half sphere.

Click “Ok” to apply the specifications and make half sphere 3D solid model.

Watch SolidWorks Video Tutorial for Making Solid Sphere:-
This is step by step solidworks tutorial to make a sphere in solidworks. It also shows how to make half sphere if you have any doubts, ask through comment box.
Follow me on Facebook, Twitter, Instagram, Telegram and Youtube

SolidWorks Tutorial 13: Extrude Boss/Base Feature Tool

How to Create Support Block 3D Design | SolidWorks Exercise 6
