SolidWorks Tutorial 18: Swept Boss or Base Feature
Hi Friends, Welcome to SolidWorks Tutorials for beginners training series. In this Post I am going explain how to use Solidworks swept boss or base feature to create different Solidworks parts. Before going to start the solidworks tutorials, just go through Swept Boss or Base feature used in this cad software.
Note: This is just tutorial showing how to use swept boss or base tool, not showing any product drawing or designing in it. If you are advanced SolidWorks user please avoid it. This Solidworks tutorial is for beginners, students or people likes to learn about SolidWorks.
Checkout Best SolidWorks Training Materials here.
What is Swept Boss or Base?
Solidworks Swept boss is one of the useful features which help to sweeps a closed profile through an open or closed path. That means, if you have closed profile (e.g: circle) and have a open or closed path ( e.g: two curved line or rectangle); then you can sweeps the closed profile to make your desired part using Swept boss feature.
Swept Boss or base feature is very useful tool, which helps to create 3d product design parts. Some of the application examples are create spring model, complex hollow pipes, air conditioning ducts, curved rods, tubes, twisted parts etc.
Watch SolidWorks Swept Boss/Base Video Tutorial (Follow Path Method) by Hotshotracer91 :-
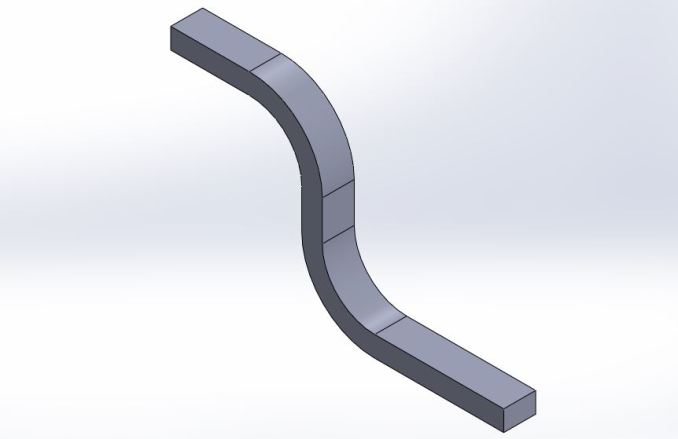
In this Solidworks tutorial, I am going to create solidworks part as shown in the figure. This is just an example showing, how to use the swept boss or base feature in solidworks.

Note: Dimensions are taken roughly for this tutorial.
Related SolidWorks Features Tools Tutorials:-
How to Use Swept Boss or Base Feature
I think you should understand about the Swept Boss feature. Let us how to use it in Solidworks. If you are still have doubt, feel free to ask in the comment or contact form.
Step-1: Create New Part File
Open the Solid works and New part File. If you don’t know it, Read How to Create New Part File. Select the Plane (e.g. Top Plane) and normalize using the “Normal To” Button. Also Read SolidWorks Heads-up Toolbar on this blog.
Step-2: Draw Line sketch
Click on the “Line” from the Sketch tools. Simply draw line sketch contain bend (direction changes from 45 to 90 degree). Here, I uses 90 degree bend which is shown below.

Here I made additional modification on the bend portion to how to use fillet in line sketch.
Click on the “Fillet button” from the sketch command manager and select two lines which contain a bend (90 degree). Give the fillet radius. By default, it is 10 mm, is shown below.

Click on the “Green tick” as shown in the fillet property manager.
Resulting sketch will look as shown below.

Click on the “Exit Sketch” button.
Step 3: Create Closed Profile for Sweeping in New Plane
You made the line sketch as shown in the above figure. Then go to the “Feature Command manager”.
Select your “Sketch 1” file by clicking on it and click on the “Reference Geometry” button. Then you can see a down drag menu, from that select “Plane”.

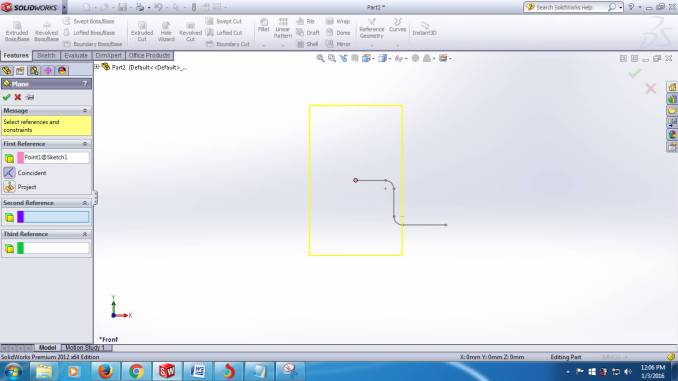
Then select the one of the start point of the line sketch, where you want to create closed profile as “First Reference”. In this example, I select the left end of the line sketch as “First Reference”.

Then you also need to select the “Second Reference”. For that, select the first line (which contains the start point) itself. Then you can see the plane automatically arranged perpendicular to that line. Click on the “Green Tick Button” in the Plane Property manager.

Click on the plane and use “Normal To”.

Select the “Center rectangle” tool form the sketch tool manager and click on the line point and draw rectangle (take dimensions roughly).

Again click on the “Exit the Sketch” button.
Step 4: Apply Solidworks Swept Boss or Base Feature

Go to Featuremanager, first select the “Sketch 4” from the Featuremanager design Tree. Then click on the “Swept Boss or Base” button.

For the proper working of Swept boss feature, you must select the “profile and path” which is shown in the swept boss/base property manager.
Here closed profile is “rectangle” which is names as “Sketch4” and path as “Sketch1”. You can see the preview below.

Click green tick button to create the model
Note for Beginners:
When you are using Sweep boss or base feature, the closed profile or its plane must touch to the path its follows. If there is any distance between profile plane and path, sweep boss will not works.
Related SolidWorks Sketch Tools Tutorials:-
SolidWorks Sweep boss using Other Methods Videos:-
Sweep Boss/Base using Normal Constant Method Video Tutorial:-
Sweep Boss/Base using 1st Guide Curve and Follow Path Method Video Tutorial:-
Additional Info: Swept Property Manager
Check on the Swept property manager and you could get different options. I also explain the swept property manager and how it effect on your example model.
Profile and path: In this section, you need to select the closed profile and open or closed path as you need to sweeps through it to make the model. First select the closed profile and then shows the path as you need to sweeps the profile through it.
Options: The options contain two main sections such as Orientation/twist type and Path alignment Type.
The orientation type contains different sub-options are Follow path, Keep normal constant, Follow the path and 1st guide curves, Follow the 1st and 2nd guide curves, Twist along path and Twist along path with normal constant.
The path alignment type controls the alignment of the path. It contains sub-options such as none, Minimum twist, Direction Vector and all faces.
Best idea to study these options is try on your base model.
Thin Feature: Using the Thin feature in Swept boss or base property manager, you can create the hollow rectangular duct in this example. Select the thin feature and enter the thickness. You can use the Swept Cut tool for creating this type of hollow rectangular pipes.

I hope you understand how to use swept boss in solidworks cad software. If you like my tutorial, feel free to like and share your honest opinions about it. Thank you friends.
To get more solidworks tutorials, Follow me on Facebook, Twitter, GooglePlus and Pinterest.
Related Posts

SolidWorks Hole Wizard Tool_SolidWorks Tutorial 28

SolidWorks Tutorial 24: Loft Cut Features Tool Tutorials

